Showing posts with label Nail arts tutorials ❤. Show all posts

Saturday, December 8, 2012

Dream catcher nail art tutorial #12

Hello my dearest readers! It's been so long time I didn't update my blog right? I'm really sorry about that. Somehow, I felt that blogging actually makes people bored -.- Agree? Plus, there is some problem about the uploading photos. Pffttt! Guess what? I'm going to teach you guys dream catcher nail art tutorial! Hurry up and grab your tools and follow my steps!

Lets begin!


 Paint a double layer of aqua blue.

Using a nail colour brush and draw a line like what I did.

 
Next, slightly using the nail colour brush and form it like feather and then apply a layer of glitter.
I'm really sorry about this. I forgotten to snap the first step that I've made for this finger.
I'M SORRY!
Just follow what I've drew.


 Add on some dotting to make it look more nicer. 
Then add on 3 feather at the bottom there.


We going to do something like 蒲公英 on the ring finger.

Using the white brush to do some stripes.

 
 Then apply on some glitter.
 

 THE END!

If you have faced any problem please comment, I'll try my best to help you out! Bye! 

Liv the C'est la vie

Wednesday, July 11, 2012

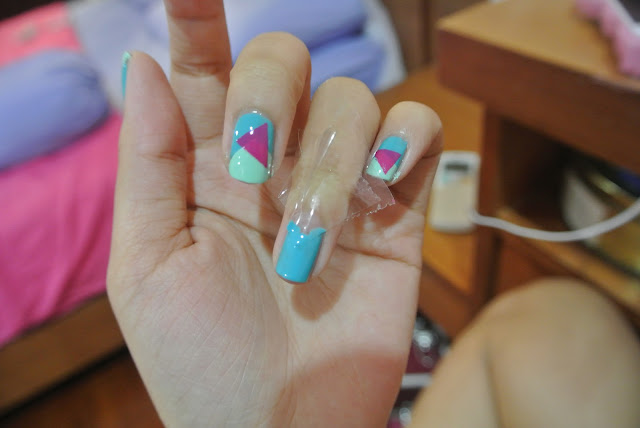
Triangle △ nail art tutorial #11

Hello guys! I'm back! This is a short post of nail art tutorial. Enjoyy!


All you need to prepare are a scotch tape and some nail polish shown at above.


First, cutting out some scotch tape to stick on your nail and form a shape like above.


Second, pain a layer of turquoise colour.
 
 Next, tear it out the scotch tape slowly and you will get something like this.


Then, repeat the same step as above and you will form a triangle.


This took me like hours.
Ohgod!
You must be very patient when you're doing this nail art!
Or else you won't get the result.
I redo it lots of times, urghhh!
The fading part you can click it to have a look! :))
http://livthecestlavie.blogspot.com/2012/04/fading-nail-art-tutorial-10.html
Bye peeps!

Liv the C'est la vie


Friday, April 20, 2012

Fading nail art tutorial #10 ❤

 HELLO HELLO HELLO HELLO, PEOPLE! Yea I know, it's been ages I didn't update my blog. Sorry! My bad :// Actually, is not kinda long right? One week more? Lol! Last time, I used to update my blog once a week. But now.... mmaaa laziness kinapped me! :O Lol! As you know, my college life have already started so I can't spent to much time on blogging -.- Andd my business studies is going to have an exam soon. Like wtf! -.- I don't know what the heck is my lecturer talking about. Few days ago, my lecturer suddenly gave us a test. I was like WTF! My answer like so short, I saw others answer like Omg! Are you writing an essay? Like soo shitty lahhh! Super hate it!


Okay, let's back to the topic! One of my readers requested my to do this nail art tutorial. I took it like 2378654321 time. Lol! Sorry for the waiting. Heh! But now, I made this for you! :))


All you need to prepare are a sponge and some nail polish shown at above.


Paint a layer of base coat.
Must!

Second, prepare a sponge.
Any sponge :))

Flip it and make it more thicker.
So, it's easier to let you do the next step.

Take out some black nail polish and place it whatever you want. 
Of course, not on top of the tissue. 
Lol!
Maybe a plastic will do.


Then, using the sponge and dip it.


Next, dip it from the top to the bottom.
Make sure that the strength that you dip is more softer.
p/s: dip it more darker on your tip.


Do you get the result like this?

Lastly, paint a layer of glitter and you're done!

Thanks for the reading! I hope this will help you! Hey you, don't forget to visit back ma blogg next time! Ohno! My computer seems like burning, going to off soon! Bye bye!

Liv the C'est la vie

Friday, April 6, 2012

Fantastic baby nail art tutorial #9 ❤

WOW FANTASTIC BABY
DANCE I WANNA DAN DAN DAN DAN DANCE FANTASTIC BABY
DANCE I WANNA DAN DAN DAN DAN DANCE WOW FANTASTIC BABY

BOOMSHAKALAKA!
LET'S BEGIN!
Fantastic baby ❤


All you need to prepare are nail colour brush (black), double point dot and some nail polish shown at above.


Paint your nail like shown at above.

THUMB

First, paint a layer of nail on your thumb.

Second, paint a layer of maroon colour into half.


Next, using turquoise colour dot some dots.

Repeat the same step as above, but using maroon colour.

Then, do it like leopard print.
If your my new reader, it's okay.
Go and view for my Leopard print french nail art tutorial and you will get your leopard print :))

INDEX FINGER

Paint a layer of turquoise colour.


Second, paint a layer of black like french manicure.

Third, using the dotting tools and dot 2 big dots.

Fourth, using nail colour brush and draw something like that.
Like melting ice-cream! 

 MIDDLE FINGER

First, paint a layer of maroon colour.
Then, using turquoise colour paint it like french manicure.


Next, using nail colour brush and draw some triangles on it.

 RING FINGER

Do it like leopard print.

BABY FINGER

First, paint a layer of white.

Then, using turquoise colour to do some stripes.


HUALA!
FANTASTIC BABY!
BOOMSHAKALAKA!

 
 Have fun on my nail art tutorial! Good night peeps!  


Liv the C'est la vie


Wednesday, March 28, 2012

Ribbon is LOV∈ nail art tutorial #8 ❤

Hello peeps! I made another nail art tutorial again! Guess what? It's ribbon! I'm a big fans of ribbon! ❤ You too right? So, let get this begin!

Black Ribbon Pictures, Images and Photos


All you need to prepare are nail colour brush (black & white) and a maroon nail polish shown at above.


First, paint a layer of maroon nail polish like french manicure (sorry! I forgot to capture it! :X)
Second, using a nail colour brush (white) draw a ribbon shape.


Next, fill in the blank! 


Last, using a nail colour brush (black) outline the ribbon.
And, you're done!
bow Pictures, Images and Photos


Larger picture
ribbon gif Pictures, Images and Photos
  Any comments? Hee! So that's all for this post! Bye bye! 


 Liv the C'est la vie